3D Scanning & Measurement Service
Our first-class setting department is where our skilled operators meticulously remove distortion from components following the quenching process. With the inclusion of our new Quantum E ScanArm, we now offer an option that significantly accelerates these processes. The remarkable efficiency of the Quantum E ScanArm is achieved when the FARO Laser Line Probe option is attached to a FaroArm.
Our 3D Scanning & Measurement Process
- FARO Equipment
- FARO Quantum E ScanArm
- FARO Laser Line Probe
- Prizm Laser Line Probe
- Detailed Reports For Customers
- Certified Against ISO 10360-12:2016
Alloy Heat Treatment (AHT) is proud to announce a significant enhancement to its setting department’s precision capabilities. To expedite the throughput of our crucial work, we have recently acquired the cutting-edge Quantum E ScanArm from FARO UK, a leader in advanced measurement and imaging solutions.
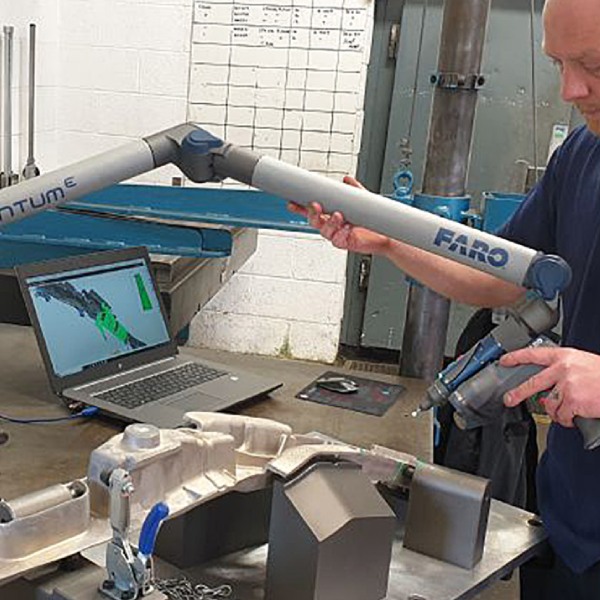
FARO Quantum E ScanArm
At AHT, our first-class setting department is where our skilled operators meticulously remove distortion from components following the quenching process. With the inclusion of our new Quantum E ScanArm, we now offer an option that significantly accelerates these processes. Utilizing the scans captured by our state-of-the-art FARO equipment, our talented staff can make precise corrections to components, ensuring that they adhere precisely to our customers’ requirements. By rescanning the components, we can verify their accuracy and guarantee top-notch quality.
FARO Laser Line Probe & Prizm Colour Laser Line Probe
In addition to expediting our processes, the Quantum E ScanArm empowers us to generate detailed reports for our valued customers. Furthermore, for those who already possess their own FARO equipment, we can provide comprehensive scan data for clients to analyze independently, offering them greater flexibility and control over their projects.
The remarkable efficiency of the Quantum E ScanArm is achieved when the FARO Laser Line Probe option is attached to a FaroArm. This combination transforms it into a super-efficient ScanArm, capable of delivering an impressive up to 600K metrology points per second. To further enhance the capabilities of our FARO Quantum E ScanArm, we have equipped it with the Prizm Colour Laser Line Probe. As the world’s only colour laser line probe for portable measurement arms, the Prizm Laser Line Probe enables us to capture accurate colour point cloud data across various applications, ensuring uncompromising performance.
3D Scanning & Measurement Resources
FARO Laser Line Probe & Prizm Colour Laser Line Probe
In addition to expediting our processes, the Quantum E ScanArm empowers us to generate detailed reports for our valued customers. Furthermore, for those who already possess their own FARO equipment, we can provide comprehensive scan data for clients to analyze independently, offering them greater flexibility and control over their projects.
3D Scanning & Measurement Certified Against ISO 10360-12:2016
FARO’s dedication to excellence is evident in their design and manufacturing of measuring arms. Quantum FaroArms, the arms we employ, are the first in the market to be certified against ISO 10360-12:2016 for articulated arms. This certification sets a new industry performance standard, guaranteeing maximum measurement consistency and reliability. By utilizing the Quantum FaroArm, we assure our customers that their components undergo rigorous and accurate measurement processes, resulting in superior quality and precision.
What sets us apart is the portability and ease of setup provided by the FaroArm. AHT is delighted to offer this exceptional service not only at our own site but also at our customers’ premises. Whether it is the convenience of having us handle the scanning process in-house or the requirement for us to visit our customers’ sites, we are equipped to deliver outstanding results. Our 3D scanning and measurement service can be combined with or without our renowned heat treatment service, allowing our customers the flexibility to choose the option that best suits their needs.
3D Scanning & Measurement: Blogs, News & Resources
We have a list of helpful blogs on the subject of 3D Scanning & Measurement, feel free to search our knowledge base and our blogs to familiarise yourself with the processes we undertake during the 3D Scanning & Measurement service.
Blogs:
FARO Quantum E ScanArm: Elevating Alloy Heat Treatment in West Midlands
3D Scanning & Measurement FAQ’s
The 3D scanning and measurement service offered by Alloy Heat Treatment (AHT) using the Quantum E ScanArm from FARO UK brings numerous advantages to the table. However, it’s important to acknowledge that there are also certain limitations and disadvantages associated with this service. Let’s delve into both aspects:
Precision and Accuracy: The Quantum E ScanArm offers high levels of precision, allowing for accurate measurements and scans of components. This ensures that the dimensional data captured is reliable and can be used for various applications, including quality control and reverse engineering.
Time Efficiency: By utilizing the Quantum E ScanArm’s advanced technology, AHT can expedite the scanning and measurement processes. This efficiency not only saves time but also enables faster turnaround times for customers’ projects, increasing overall productivity.
Versatility: The inclusion of the Prizm Colour Laser Line Probe with the Quantum E ScanArm allows for the capture of colour point cloud data. This feature is particularly advantageous in applications where colour information is critical, such as visual inspections and accurate representation of textured surfaces.
Portability and On-Site Service: The FaroArm’s portability facilitates on-site scanning and measurement services. AHT can perform the scans either at their own facility or directly at the customer’s site, offering convenience and flexibility to clients who may prefer to keep their components in-house or require on-location measurements.
Comprehensive Reporting: AHT can generate detailed reports based on the scan data, providing customers with comprehensive insights into the dimensional accuracy of their components. This aids in quality assurance, documentation, and compliance with industry standards.
3D scanning and measurement provide accurate and detailed dimensional information about components in the automotive and aerospace industries. It helps with quality control, reverse engineering, dimensional inspection, and ensuring precise fit and alignment of parts.
Yes, the FARO Quantum E ScanArm is designed to handle large and intricate components commonly found in the automotive and aerospace industries. Its articulating arm allows for easy manoeuvrability, and the scanner captures detailed measurements of complex surfaces and geometries.
Absolutely. 3D scanning captures the geometry and intricate details of existing components, facilitating reverse engineering processes. It allows for the creation of accurate CAD models, enabling manufacturers to reproduce or modify parts based on the scanned data.
Yes, the FARO Quantum E ScanArm is portable and can be used for on-site or in-field scanning applications. Its mobility allows for measurements to be taken directly at the location of the component, minimising downtime and transportation costs.
Yes, the scanned data from the FARO Quantum E ScanArm can be integrated with various software and analysis tools. The data can be exported to common formats compatible with CAD software, metrology software, or inspection software for further analysis and reporting.
Cost: The investment in advanced 3D scanning equipment ie Quantum E ScanArm, will result in higher costs compared to traditional measurement methods. This may pose a financial challenge for some customers, particularly for smaller businesses with budget constraints.
Skilled Labour: Operating and maximizing the capabilities of the Quantum E ScanArm necessitates trained and skilled operators.
Limitations on Size and Complexity: The scanning capabilities of the Quantum E ScanArm may be limited by the size and complexity of the components being measured. Extremely large or intricate components may pose challenges in terms of positioning and capturing comprehensive scan data.
Interpretation and Analysis: While the service provides detailed scan data, the interpretation and analysis of the acquired information require expertise and specialized software. Additional support or resources for processing and utilizing the scan data effectively, may be necessary.
Environmental Limitations: The effectiveness of the scanning and measurement process may be influenced by the environmental conditions in which it takes place. Factors such as lighting, temperature, and stability of the scanning environment can impact the accuracy of the results.
The FARO Quantum E ScanArm is a portable coordinate measuring machine (CMM) equipped with a laser scanner. It allows for contact and non-contact measurements, enabling fast and accurate data capture of complex surfaces and features.
3D scanning and measurement help in quality control by comparing scanned data with CAD models or specifications. It identifies deviations, defects, or dimensional variations, enabling manufacturers to rectify issues and ensure compliance with quality standards.
The FARO Quantum E ScanArm offers several advantages, including high accuracy, quick setup, portability, flexibility, and the ability to capture both contact and non-contact measurements. It enables efficient data collection and analysis for various applications.
Yes, the FARO Quantum E ScanArm provides real-time data feedback during scanning. The scanned data is displayed on the system’s interface, allowing users to assess and verify measurements on the spot, ensuring data quality and accuracy.
A metallurgy or heat treatment company can benefit from 3D scanning and measurement services by obtaining accurate dimensional data for components. This information aids in process optimization, ensuring proper fit and alignment, and facilitating quality control for their specific applications.
